MiNiFi Installation
Introduction
EDRs may be copied to the reporting node for processing by Apache MiNiFi, a smaller reimplementation of the full NiFi solution. MiNiFi focuses on data transfer from satellite systems to the main NiFi processing service.
MiNiFi supports both unencrypted and encrypted secure transmission between the service nodes and the reporting service. Transmission control is first configured in the NiFi user interface and then text-based configuration files are derived from the NiFi host and used by MiNiFi.
MiNiFi uses two or three TCP/IP connections for communication with the NiFi service, depending on this configuration. EDRs are sent over one of these paths and stored, via NiFi, on disk on the reporting server.
Operational users configure the NiFi service on the reporting service node, and configure both NiFi and MiNiFi manually.
Architecturally, the model is summarised by the following diagram:
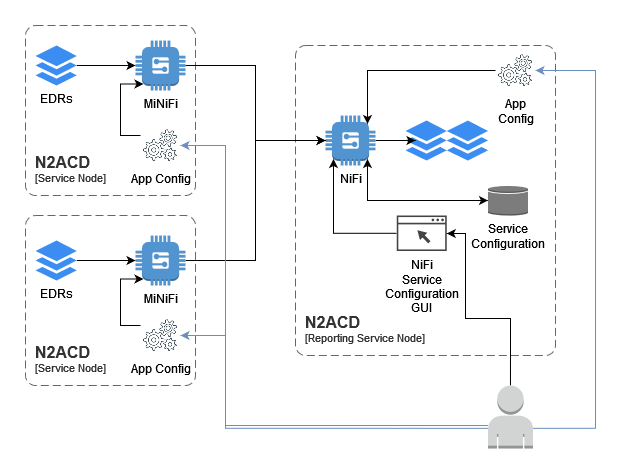
Note that EDRs can be transferred to the main NiFi system using any relevant technology/facility - including manual SCP, scripts utilising SFTP etc. The MiNiFi solution described in this installation page is optional, and may be replaced with another solution if appropriate.
Installation
As with the Apache NiFi installation, N-Squared provide a wrapper package
around the MiNiFi .zip distribution from Apache. Install MiNiFi from the
N-Squared repository. Execute the instructions specific to your operating
system:
| RHEL 8 | Other RPM-based Systems |
|---|---|
sudo dnf install n2minifi-wrapper |
sudo yum install n2minifi-wrapper |
Warning: The package installation will shut down Apache MiNiFi if it is running.
The Apache MiNiFi installation using the wrapper package will:
- Install Apache MiNiFi in subdirectories of
/opt/minifi - Configure Apache MiNiFi for execution via systemd as the service
minifi.
The MiNiFi directory consists of the following important files and directories:
/opt/minifi/binThe MiNiFi start/stop script and additional N-Squared scripts are stored here./opt/minifi/edrBy Default MiNiFi will read EDRs from/opt/minifi/edr/input. Other directories are not directly used by MiNiFi./opt/minifi/confConfiguration files are stored in this directory. The important files areconfig.yml, which is an export of the relevant processes from NiFi to control MiNiFi, andminifi.propertieswhich controls MiNiFi startup and NiFi base connectivity./opt/minifi/logsThe MiNiFi log fileminifi-app.logreceives all log output by default.
The Apache MiNiFi configuration is designed to only copy files from the local
file system to the main Apache NiFi service installed on the ACD reporting service.
This configuration is controlled by the configuration file /opt/minifi/conf/config.yml
which is a YAML formatted file of a NiFi data processing pipeline.
This YAML file is exported from NiFi as an XML template, and converted using a MiNiFi tool. It can be edited to some extent manually, however major changes should be done in the NiFi GUI and the template re-exported and re-converted.
For more information on this process, see below.
EDR Transfer from N2SVCD
ACD EDRs are generated by n2svcd and stored in a local directory on disk. This may
be a directory such as /app/edr or /edr. It is important this is not the same directory
that is used by MiNiFi for reading EDRs - otherwise there is the risk that a file will
be read while still being written by n2svcd.
Using a moveAndCopyOnWriteComplete-minifi service, the ACD MiNiFi installation
will move ACD EDRs from this source directory to the input directory for Apache
MiNiFi to read and process. The default directory is /opt/minifi/edr/input.
It is important to note that an EDR file that is successfully read by Apache MiNiFi will be deleted off disk, even if not yet copied from the SVC node to the reporting node. Apache MiNiFi has its own buffering and storage system for in-flight data which stores EDR files until the stream processing can be completed.
For this reason the moveAndCopyOnWriteComplete-minifi service will move the
file from the source (where n2svcd saves it) to the MiNiFi input directory, and also
can be configured to save a backup of this file in another directory (e.g. /opt/minifi/edr/backup)
To configure the service, the configuration file
/usr/lib/systemd/system/moveAndCopyOnWriteComplete-minifi.service must be
edited to configure the correct source for EDRs:
systemctl edit moveAndCopyOnWriteComplete-minifi.service --full
The default source directory is /var/log/n2svcd/edr. The default destination
directory is /opt/minifi/edr/input.
Note that when using the backup mechanism of this service, be very aware of disk space. In a production system, insufficient disk space can lead to severe consquences for running services as the disk fills up with backup files.
Note that only files ending in .edr are moved between these directories, and files
starting with . are ignored.
On first install, enable the script once configured:
systemctl enable moveAndCopyOnWriteComplete-minifi.service
systemctl start moveAndCopyOnWriteComplete-minifi.service
File Monitoring
The MiNiFi package also installs the monitorAndAuditFileChanges-minifi script. This can be configured
and edited on the EDR source system as well:
systemctl edit monitorAndAuditFileChanges-minifi.service --full
This script must also be enabled after first install. Ensure it is run on startup:
systemctl enable monitorAndAuditFileChanges-minifi.service
systemctl start monitorAndAuditFileChanges-minifi.service
It is recommended this script is enabled and started as it can help audit and track file processing of EDRs through the system described by this installation documentation.
Creating the MiNiFi Processing Configuration
A default MiNiFi processing configuration is distributed with the minifi-wrapper package.
This configuration consists of three components:
- The transfer of files from the service nodes to the reporting server.
- The receiving of files on the reporting server from the service nodes.
- The processing of received files.
In NiFi these three processes are organised into “Process Groups” in NiFi:
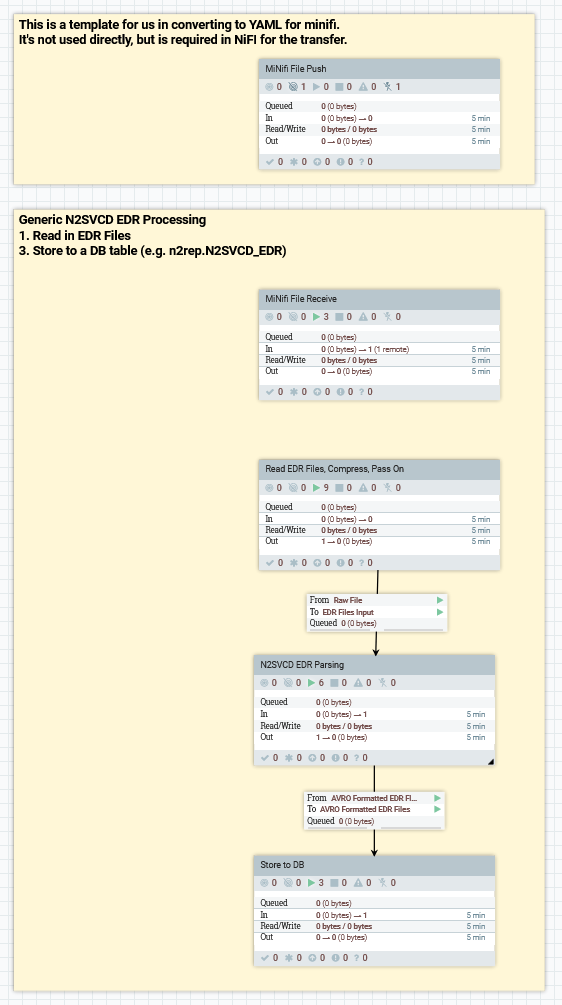
The MiNiFi File Push and MiNiFi File Receive groups are closely tied together. Together
with the nifi.properties file on the reporting server, and minifi.properties on the
service nodes, these processes have files transferred from the service nodes to
the reporting server.
Each of the process groups must be imported as templates from the N2ACD reporting distribution first. To import each:
- Load the NiFi editor (e.g. https://n2-reporting-01.nsquared.co.nz/nifi/) and log in. If using the secure (HTTPS) configuration
- Using the small “Upload Template” icon from the overall “NiFi Flow” process group, open the template upload dialog.
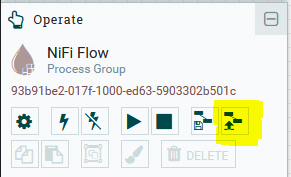
- Select from the file menu each process group being imported in turn. These are provided with the
n2nifi-wrapperpackage and installed into/opt/nifi/install/conf. - After the template has been uploaded, Drag the “template” node to the canvas, selecting the uploaded template you want to create.
- Make changes to the template as required (see below).
The “NiFi File Receive” Process Group
The NiFi File Receive Process Group first starts with a special NiFi processor called an Input Port. An input port defines a local destination that remote NiFi and MiNiFi instances can send data to.
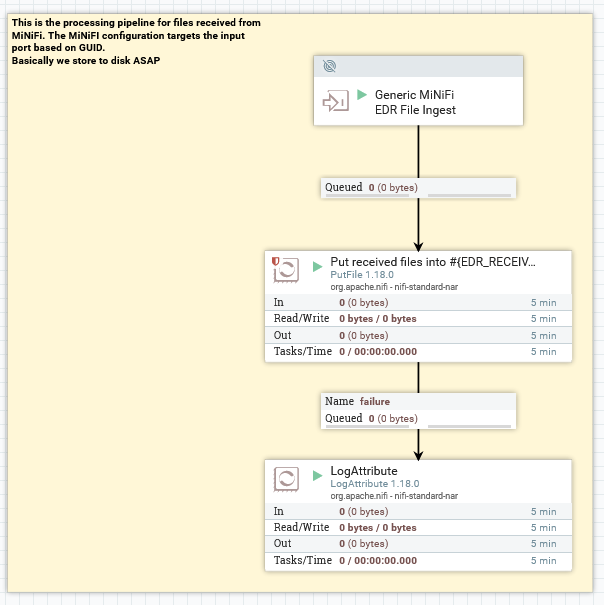
This group receives files from remote NiFi instances. NiFi has a correlation mechanism to correlate the input node with the output node used by the remote instance based on the iD (the GUID) of the node itself. The ID of the “MiNiFi EDR” input node is what is used by MiNiFi to determine what “input port” to send data to:
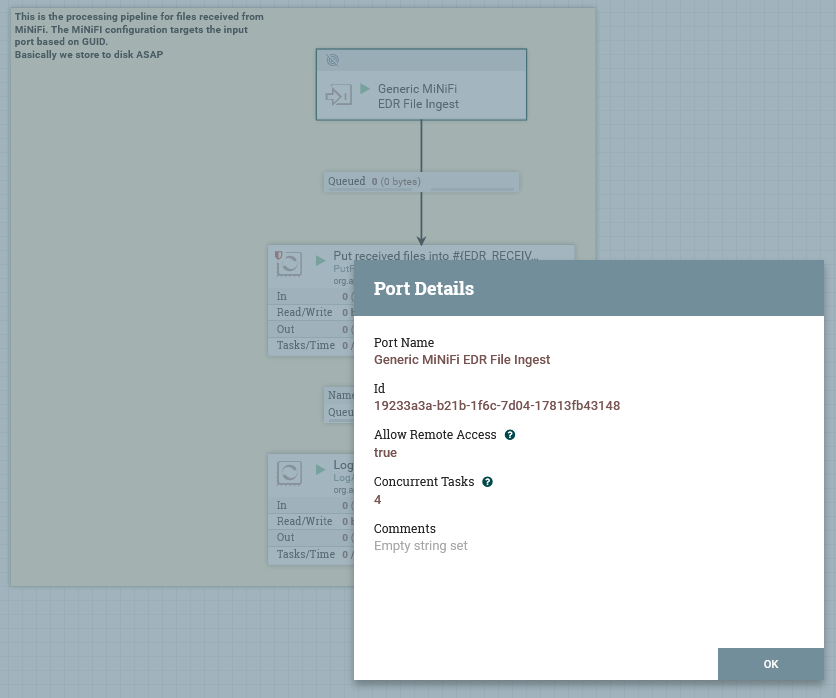
The PutFile node will write files immediately to disk. Actual processing is then done by reading these files back out from
disk again (after they are copied from the receive directory to the input directory by the moveAndCopyOnWriteComplete
service).
The PutFile node determines where the files are placed:
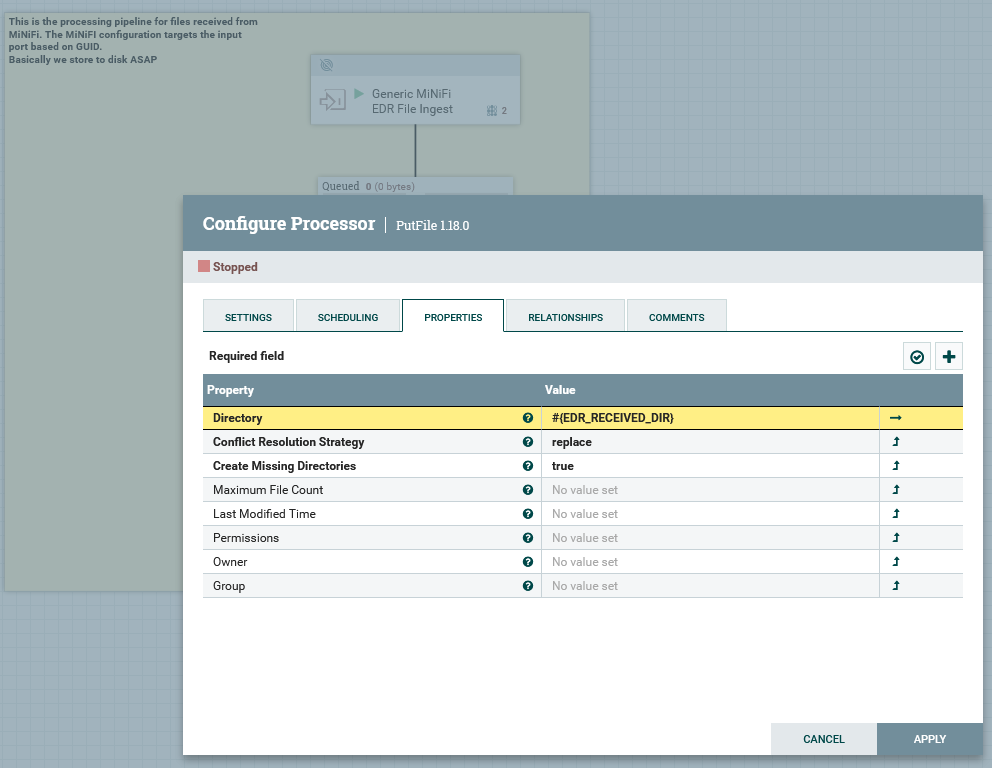
Note the use of the NiFi property #{EDR_RECEIVED_DIR} requires the use of
a NiFi Parameter Context to define the environment value for this parameter.
The “MiNiFi File Push” Process Group
The NiFi File Push Process Group first starts with a special NiFi processor
called an Remote Process Group. A remote process group is a placeholder
processor that is part of the exported configuration stored in config.yml
and read by MiNiFi to determine how to connect to NiFi.
This design allows an operator to describe data stream processing that MiNiFi will perform within NiFi using standard NiFi style processors. The processed data will be sent to the remote process group, which is effectively a data sink that is connected to the “NiFi File Receive” input port via configuration.
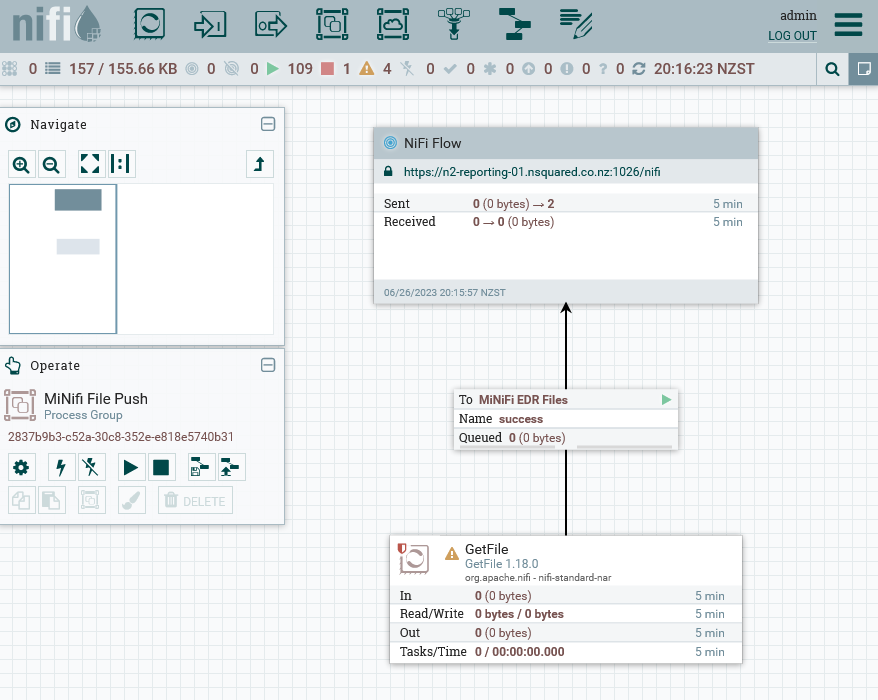
This process group sends files from remote NiFi instances to the main NiFi reporting instance. This group does not actually activate on the NiFi instance but is instead exported and then loaded into the SVC MiNiFi instances.
The GetFile node determines where files are read from. It is expected that
the moveAndCopyOnWriteComplete-minifi service is run on each service node to copy
N2ACD EDRs from the N2SVCD source directory into the MiNiFi input directory (on
the SVC itself). Then the MiNiFi instance will copy the file from the service node to
the reporting service.
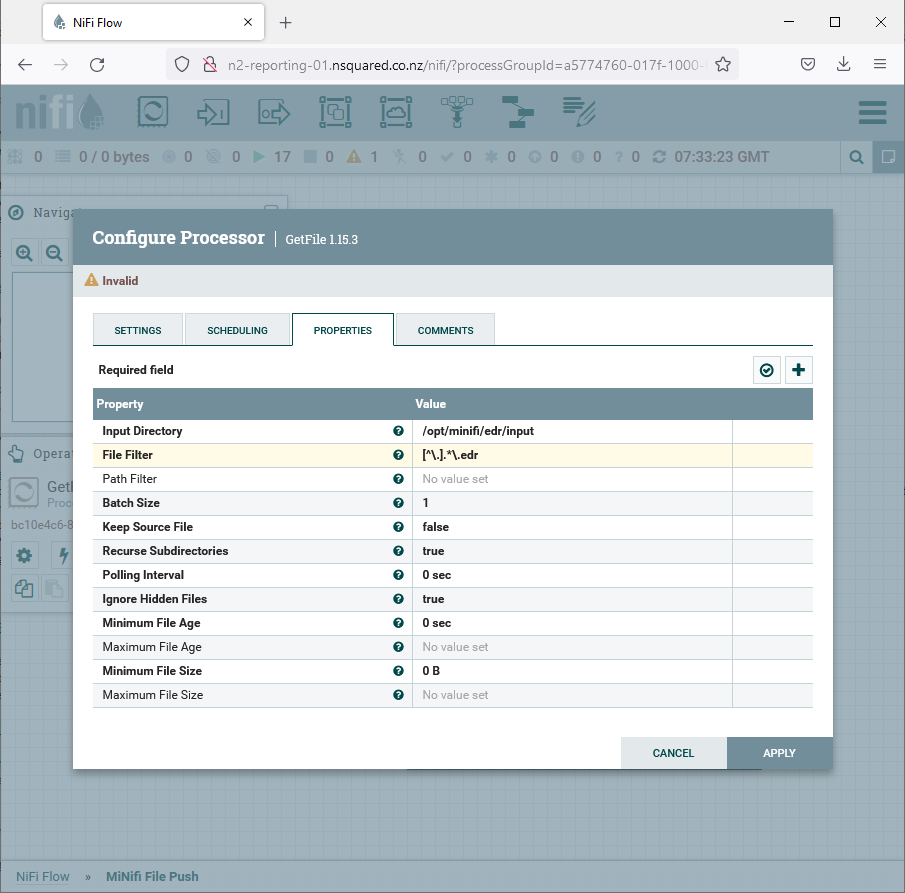
It is important that the input file format and input directory is correct in
this configuration. Note that the Batch Size is set to one by default to
have only one EDR file ever read into the MiNiFi internal cache, leaving the
rest of the files to move (if any) on disk in the input directory.
In a production environment, it is suggested this is increased slightly to, for example, 10, however due to the speed and efficiency of file transfers it is unnecessary to increase this significantly.
Unlike normal connectors, connectors in NiFi that connect into a “Remote Process Group” actually configure the Input Port (the “MiNiFi EDR” node from the “NiFi File Receive” process group). If the name of the input port changes, this needs updating:
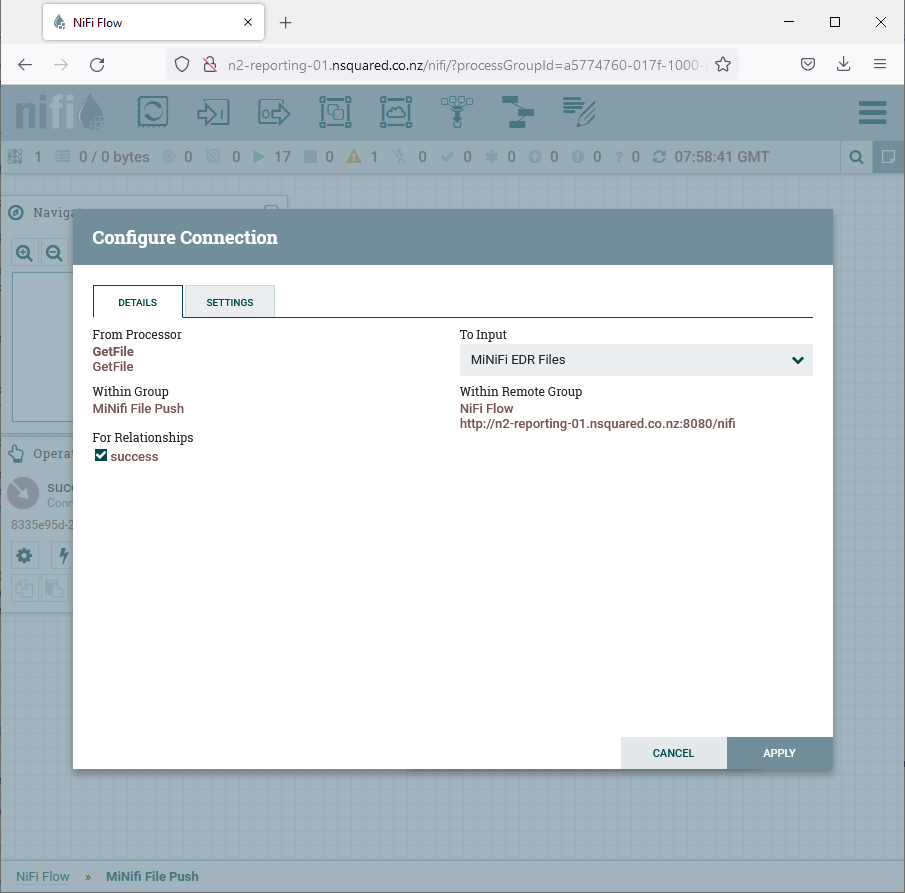
The most important aspect of configuration, and one that must be done on each environment independently after import of the process group template, is the configuration for the URL of the NiFi host:
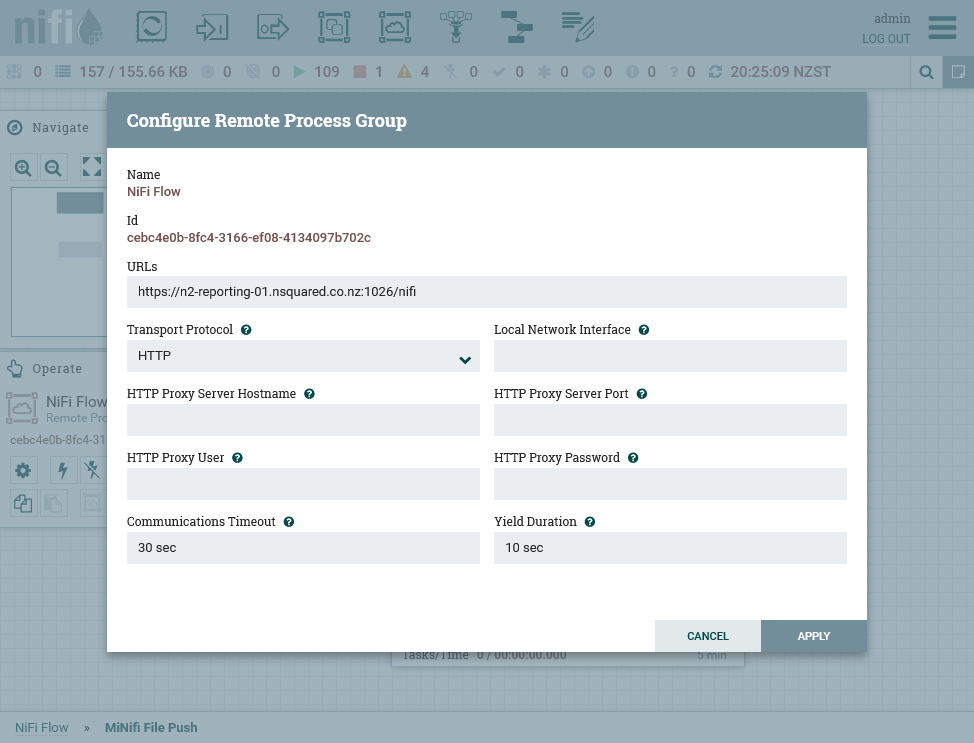
The following configuration changes must be applied:
- The URL must be set to the URL on which NiFi listens (not the one accessible to external users).
Using the installed configuration, this will be the fully qualified host name of the server, port
8080, with the path
/nifi. It will be accessible over HTTPS, unless the configuration is changed innifi.properties. This is the internally understood name/host of the NiFi instance should not be the behind a reverse proxy.
The hostnames that NiFi allows can be retrieved by running:
wget http://n2-reporting-01.nsquared.co.nz:8080/nifi-api/site-to-site
on the reporting server. If this does not work, but is received by NiFi, it will respond with a list of hostnames over which NiFi can be accessed. In this processor node:
-
The transport protocol must be set to HTTP, unless
nifi.remote.input.socket.portis set innifi.properties. -
If NiFi cannot be accessed directly by service nodes on port 8080, the HTTP proxy configuration must be configured with the hostname and port that the MiNiFi instances should use to access NiFi on the reporting server. Note that this is a HTTP, not HTTPS, proxy.
-
If NiFi is configured to use HTTPS not HTTP (i.e. in
nifi.propertiesthenifi.web.https.hostandnifi.web.https.portconfiguration options are set, rather than the equivalenthttpoptions), then the URL should behttpnothttps. HTTPS comes with additional requirements, such as client certificates. It is suggested that HTTP is configured first, verified as working, then HTTPS is configured.
Troubleshooting
Configuring MiNiFi and NiFi to communicate can be challenging. Step through these troubleshooting tips if there are issues:
-
Apache HTTP. Apache should be used as a HTTPS proxy for the GUI only. The default proxy configuration is stored in
/etc/httpd/conf.d/nifi.confand is configured to connect tohttp://127.0.0.1:8080. If the NiFi UI is not accessible, this is the first point to check. The IP address (127.0.0.1) must be changed to the hostname that is acceptable to NiFi (as configured in itsnifi.propertiesconfiguration file). -
MiNiFi - NiFi Connectivity. To connect MiNiFi to NiFi, verify the configuration in
/opt/nifi/latest/conf/nifi.properties. Particularly, ensure that the hostnames that NiFi is configured to start up and listen on (e.g. n2-reporting-01.nsquared.co.nz:8080) is consistent with the configuration used in the GUI as the push URL for files from the service nodes. -
MiNiFi Configuration. Ensure in the MiNiFi configuration file that the GUID of the “Input Ports”
idfield is the same as the GUID of the “MiNiFi EDR” receive process in the GUI.
It is possible for MiNiFi to successful transfer files to NiFi, but receive
an error back from NiFi. The error in the minifi-app.log file will be similar to:
[org::apache::nifi::minifi::sitetosite::SiteToSiteClient] [warning] Site2Site transaction 56c99f76-131c-11ee-b2b2-ba51c0187852 peer unknown respond code 14
This error occurs when MiNiFi has read in too many files to stay below the
NiFi transfer limit configured for the remote process group. To fix this,
in the queue between the Input Port and the PutFile process (in the NiFi File Receive process group), update the Back Pressure Object Threshold
to be above the number of files waiting to be transferred. This will require
stopping the Input Port & PutFile processes on either side of the queue.
Loading the “MiNiFi File Push” into MiNiFi
To actually have the MiNiFi File Push process group used by MiNiFi instances on
the service nodes (which is where it must be used), the configuration must be
converted from XML to yaml and then installed as config.yml in
/opt/minifi/conf on these nodes.
An example file, /opt/minifi/conf/config.yml.example is installed with the
minifi wrapper package. This can be used, with a few changes:
Using the provided config.yml.example
The provided config.yml.example file is the provided file push NiFi process
group. However, to use this the configuration file must be edited in a text
editor.
First, copy the example file to make a live copy:
cp /opt/minifi/conf/config.yml.example /opt/minifi/conf/config.yml
vi /opt/minifi/conf/config.yml
In the configuration file, make the following changes:
-
Replace all instances of the GUID
06911d5b-0180-1000-6094-d871a6007738with the GUID of theMiNiFi EDRinput port in theNifi File Receiveprocess group.Three locations in the config file should need replacing.
# diff config.yml.example config.yml
89c89
<     name: GetFile/success/06911d5b-0180-1000-6094-d871a6007738
---
>     name: GetFile/success/20d6c623-fabd-3a8e-1187-f07b22e8866b
93c93
<     destination id: 06911d5b-0180-1000-6094-d871a6007738
---
>     destination id: 20d6c623-fabd-3a8e-1187-f07b22e8866b
112c112
<     - id: 06911d5b-0180-1000-6094-d871a6007738
---
>     - id: 20d6c623-fabd-3a8e-1187-f07b22e8866b
-
Update the configuration of the
Remote Process Groupssection, changing the URL and proxy configuration as required to match the deployed solution. I.e. changehttp://n2-reporting-01.nsquared.co.nz:8080/nifito the hostname and port configured innifi.propertiesfor the direct HTTP URL to NiFi. -
Restart minifi:
systemctl restart minifi
Creating a new config.yml
To build the config.yml from NiFi, the following actions must be taken on
a separate computer (e.g. a laptop or desktop machine):
- Download the process group as a template from NiFi. Note to achieve this you must create a template from the process group first, then from the templates list (available from the burger menu in the top-right of the NiFi GUI) download the template.
- Using the MiNiFi toolkit (https://nifi.apache.org/minifi/download.html),
convert from the XML used by NiFi to the
yamlconfiguration format used by MiNiFi - Copy the resulting file into
/opt/minifi/confon the target machine asconfig.yml
N2ACD Dataflow Configuration in NiFi
To complete the configuration, the Apache NiFi dataflow configuration for EDR and database processing must be done in the NiFi GUI. Follow the configuration details from the dataflow configuration page to achieve this.
Enabling TLS
MiNiFi can be configured to securely connect to NiFi using TLS/SSL. To achieve this security, MiNiFi uses TLS client and server certificates with an (intermediate) CA managed by NiFi itself.
Due to the design, it is crucial for the MiNiFi configuration to correctly define certificates. It is not possible to, for example, use TLS without verifiable client and server certificates.
Assuming NiFi has been configured to use HTTPS, MiNiFi can be configured to connect securely with NiFi. Note that MiNiFi must be configured for secure communication if NiFi is.
Changes to the MiNiFi configuration for TLS consists of the following differences:
34,40c34,39
< #nifi.remote.input.secure=true
< nifi.security.need.ClientAuth=false
< #nifi.security.client.certificate=
< #nifi.security.client.private.key=
< #nifi.security.client.pass.phrase=
< #nifi.security.client.ca.certificate=
< #nifi.security.use.system.cert.store=
---
> nifi.remote.input.secure=true
> nifi.security.need.ClientAuth=true
> nifi.security.client.certificate=/opt/minifi/conf/ssl/nifi-rest.crt
> nifi.security.client.private.key=/opt/minifi/conf/ssl/nifi-rest.key
> nifi.security.client.pass.phrase=
> nifi.security.client.ca.certificate=/opt/minifi/conf/ssl/nifi-cert.pem
The following configuration fields in /opt/minifi/conf/minifi.properties must
be updated:
| Configuration Option | Purpose | Required Value |
|---|---|---|
nifi.remote.input.secure |
Informs MiNiFi that NiFi expects TLS communication. | true |
nifi.security.need.ClientAuth |
Informs MiNiFi that a client TLS certficate is required. Note that a client certificate may not be required, however the configuration for this setup is outside the scope of this documentation. | true |
nifi.security.client.certificate |
The path to the client certificate that NiFi will use when communicating with the server. | /opt/minifi/conf/ssl/nifi-rest.crt |
nifi.security.client.private.key |
The path to the client private key that NiFi will use with the client certificate. | /opt/minifi/conf/ssl/nifi-rest.key |
nifi.security.client.pass.phrase |
The passphrase to decrypt the key, if one is required. | none |
nifi.security.client.ca.certificate |
The NiFi certificate authority certificate, for MiNiFi to verify the server certificate provided by NiFi. | /opt/minifi/conf/ssl/nifi-cert.pem |
A client certificate must be generated and loaded into NiFi as a trusted client. To generate the files, see the NiFi TLS configuration.